is so easy if you use the Scor-Pal. Directions are on the back of the packaging. Simply align your 12 " x 5 1/2" cardstock across the Scor-pal. Score a 2", 4", 8" and 10". Accordion fold each side and close as in a standard gate fold card. Here is a card I came up with. I used the SU Stamp Set Baroque Motifs and the coordinating SU Designer Paper. I also covered a chipboard die-cut in SU Designer paper. I made it into an anniversary card.
Inside of the card...
I have a lot going on and won't be able to post regularly or even have the time to create cards or projects. I will in the near future post a tutorial on making the double chocolate or tea bag holders (one things settle down).
Monday, January 28, 2008
Wednesday, January 16, 2008
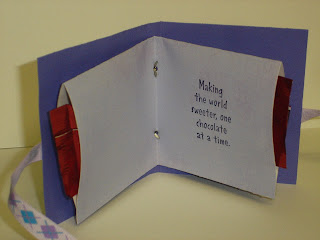
Tea Bag / Chocolate Holders
Here are a few tea bag / chocolate holders. The first one is a single. It holds one tea bag (in this project) or it could hold one square chocolate. The second project (is one I have had on my blog previously) is a double tea bag or in this project chocolate holder.
The designer paper on both projects is from Basic Grey.
The paper is SU Certainly Celery and Almost Amythyst. The Designer Paper is from Basic Grey. The Ribbon is SU Certainly Celery.
The second project is the double holder. The Designer Paper is from Basic Grey. The Outside is made with SU Lavender Lace and Taken With Teal. The Ribbon is from a wonderful SU Friend Heidi. She has an on-line store at Pink Hedge Hog Paper Crafts. Be sure to visit Heidi for a wide selection of ribbon, brads and eyelets.
Tuesday, January 15, 2008
Never Too Soon For Valentines...
Here is a square Valentine card. I think this is my first square card. I had square envelopes for a long time and thought I would use them for Valentines Day.
The original card did not have a heart candy - - it simply had a pink heart punch out showing through the heart punched on the outside of the card. Not sure if I like it with the candy...might just be the candy is too big and need something flatter.
I used Pretty In Pink Paper (ink and Paper), Whisper White Paper, Taffeta Pink Ribbon, a heart punch (I bought from Gina K) and my cuttlebug hearts embossing folder.
I made them in red and pink.
Enjoy!
Monday, January 14, 2008
Snow Day!
We got snow overnight. No school today for the kids but it's still a work day for me.
Here is another Faux Silk I made yesterday (following the tutorial on SCS). I used another SU in-color, Blue Bayou. First time I opened this ink pad or used this cardstock. It matched nicely with some new Basic Grey paper I bought.
Sunday, January 13, 2008
Faux Silk Sunday
As I was putting away some Christmas wrapping paper I noticed tissue which reminded me that this weeks tutorial over on SCS is on Faux Silk. I wanted to try it but couldn't decide on what stamp set to use. I thought I would use SU Best Blossom but couldn't find it (I know it's here somewhere) so I looked at sets I have had a long time but have never used. I found the French Flair background stamp sitting there unmounted and thought it might work. I came up with two cards more or less the same using SU purely pomegranate and some Basic Grey Designer Paper.
We are expecting 8-14 inches of snow tomorrow. Kerry is already expecting no school and I'm resting up to clear the driveway.
Saturday, January 12, 2008
Today Was Use A New Stamp Set Day....
or use a stamp set I have had for a while and never used. I picked Paper Trey Ink's Green Thumb Set. I have had it for a long time but have never used it.
I just love the new SU in-colors and used two for this card....purely pomegranate and wild wasabi. In addition, I used Whisper White Cardstock the horizontal slot punch (which was wonderful for the ribbon) and wild wasabi double-stitched ribbon. Of course, I added stickles for sparkle - - I think I add stickles to everything.
Here is the front of the card:
Here is the inside of the card:
Hope you like this card. I used it for a papertrey swap.
Friday, January 11, 2008
More Candy Holders...
Wednesday, January 9, 2008
A Candy Holder for Valentines Day
Looking for an easy item to make for Valentines Day (or any day). This is a cute little candy holder. I did not create the idea of the candy holder, I received one in a swap and hung on to it. I pulled it out the other day and thought it would make a nice valentine holder so I made one. I adjusted the measurements so I could use my scor-pal (which made it very easy and quick to make). Since so many of my friends loved this, I decided to put together a quick tutorial to show you how to make it.
First things first. The supply list:
1 piece of cardstock for the frame measuring 4 1/4 x 10 inches
1 piece of designer paper for mat (if desired)
1 piece of white cardstock for stamping (if desired)
Markers
Inkpad
Cutter
Scor-pal or scoring tool
Adhesive
Stamps
Embellishments (I used ribbon, stickles, dimensionals, glue dots, etc)
Scissors
Candy piece
Using your paper trimmer, cut cardstock to measure 4 1/4" x 10 "
Take your piece of cardstock that you are going to use as the frame and score-it at 3", 3 1/2", 6 1/2" , and 7". I used a scor-pal but you can use any scoring tool you have. The scor-pal does make it easier since you don't have to move the paper.
I used an ink that is the same color as the cardstock to stamp a background. I used SU Pretty in Pink for both the cardstock frame and background ink. I stamped on the middle of the inside of the frame (where the chocolate will be placed) and the bottom fold of the front (that will fold up and cover the chocolate).
Next take your scallop punch (or another punch you would like to use) and punch out the center of the last frame in your cardstock (this will fold up over your candy).
This is what it looks like after it is punched.
Next take you piece of white cardstock and stamp your main image. I choose the "friend" sentiment from the SU Time Well Spent Set. It is a level 3 hostess set. Demo's received this set for free. When I first received it I thought, "oh, this is o.k." but really didn't think it was my style. Having said that I have used it over and over and love the sentiments that come with it.
Once stamped, color if necessary (I used my pretty in pink marker to color in FRIENDS). Cut to desired size.
I then added some ribbon as an embellishment.
Mat your image to a piece of designer paper. I choose Basic Grey Designer Paper from their Perhaps Line.
Take some left over designer paper and stamp (in black ink) a coordinating image.
Carefully cut out the image
I used a dimensional to attach the image to the main image. It makes the image pop-up (a nice touch). Here is the front of the project put together.
Finally add the candy with a glue dot
I also added some stickles to the front of the project (I used pink)(
Here is the finished project. I made a ton and will post other versions the rest of this week.
Why don't you make one and let me know how it turns out. I hope you enjoyed my first tutorial.
Tuesday, January 8, 2008
Fancy Fold Card
Here's a little fancy fold card that I made. The stamp set is the SU Polka Dots & Paisley. The designer paper is also the matching SU Polka Dots & Paisley.
Here is a photo of the card closed.
Here is a photo of the card opened.
Bowling was fun last night...followed by some ice cream at Friendly's.
I have some more items I made. Since I organized my stamp space and work area I find it a lot easier to sit down and create. Organization is a wonderful thing.
Have a great day everyone.
Monday, January 7, 2008
Fun Weekend!
Fun weekend! With his new job, Pat is now home evening and weekends. Having said that, I was off with the girls on Sunday. I have to get used to Pat being around on the weekends! Well anyway, on Sunday I met up with the women I used to work with. We have decided to meet quarterly. We met at Jeanne's and had a nice time eating, talking and eating some more. It was good to see everyone.
This is a little project I put together over the weekend. It's a little "purse" with two pockets for the little 3x3 cards, It was fun to make. This project was all SU!
I have some more items made but I have to take some pictures.
Bowling tonight!
This is a little project I put together over the weekend. It's a little "purse" with two pockets for the little 3x3 cards, It was fun to make. This project was all SU!
I have some more items made but I have to take some pictures.
Bowling tonight!
Friday, January 4, 2008
First Project of the New Year!
For Christmas, I received a Zutter Bind-it-All. It's a machine to bind (with coils) projects such as journals. I am going to post my first try at using it but as you will see, I need more practice. This is a Birthday Calendar that I made and binded. It's my first attempt at using the bind-it-all. I don't like where I put the hole on the calendar (with my crop-o-dile) and will have to adjust that next time around. The hole is suppose to be for you to hang the calendar on the wall. I think the coils are a little too big for this project - I used the 1/2 inch coils. I will practice and post an improved Birthday calendar soon.
The first photo is of the calendar. I used cardboard for the covers (which I covered with Designer Paper).
The second photo shows one of the months to write birthdays. I made the inside sheets in a WORD DOC. If anyone wants a copy of the word doc, just email me and I will send to you.
Happy New Year!
I'll have to check but I think my one year Blog-aversary is coming up this month. Plus I am now over 5000 hits so it will soon be time for blog candy. As soon as I make a good Birthday Calendar I will have a blog candy post and give away the calendar. I'll keep you posted!
Tuesday, January 1, 2008
Happy New Year!
Wishing you all a happy new year! We had a fun time....bowling...yes I said bowling. The bowling alley had a New Years Eve Party and every lane was full. We had a wonderful time. We bowled two regular games and then decided to bowl one game with "fun frames". One frame was bowling "granny" style (using both hands to roll the bowl), the next frame was bowl like Fred Flinestone (on our tippy toes), the next frame was to bowl with your opposite hand, then we "kicked" - really pushed with our foot - the ball down the lane; there's more, then we stood at the foul line backwards and rolled the ball through our legs; then we did slow motion bowling. The funniest frame was when Pat and Paul started on one lane and criss-crossed to the others lane....funny! As you can imagine, our scores were not that high that game.
Here are some photo's from the night.
Here is Kerry Ann and Jessica doing the backward, through the legs shot.
I will start making cards again soon. Secret Sister is starting up as well as my monthly swap.
Here are some photo's from the night.
Here is Kerry Ann and Jessica doing the backward, through the legs shot.
I will start making cards again soon. Secret Sister is starting up as well as my monthly swap.
Subscribe to:
Posts (Atom)